Whether it’s automating various processes in System Center Service Manager (SCSM), documenting how to write PowerShell for SCSM so anyone can do it, scripting resources in Azure, or automating just about anything else one doesn’t want to do. It probably goes without saying, but I have a bit of an affinity for PowerShell.
And as the history of these products has unfolded, you might have started with PowerShell ISE to build scripts, graduated into VSCode for its improved IntelliSense to write PowerShell faster, and in recent years – moved into Windows Terminal as the control center for all shells as it encompasses PowerShell, the traditional cmd.exe command line, Azure Cloud Shell and more.
If you haven’t made the switch over to Windows Terminal because you shared a similar reaction as mine of: “It’s a command line tool. I only use PowerShell. What’s the big deal?” And even still, you might be wondering: “What does this blog have to do with Service Manager?” Well, I won’t keep the suspense any longer. Let’s start with a screenshot of my PowerShell window nowadays so you can start forming your own opinions:

First things first, you’ll notice things don’t look nearly as traditional as they used to if you just open PowerShell by itself as seen below:

In fact, you’ll notice that apart from some coloring and iconography I have going on, I have some real time data points appearing in my terminal. I won’t go over everything in this theme here, but I do want to touch on the fact I have a count of “My Active Work Items” every time I hit enter.

Looks like I have 5 incidents, 0 Service Requests, 1 Problem, 1 Change Request and 2 Manual Activities that I need to get to. So, it most certainly begs the question how is this possible? Is this fast? Is it real time? Well, two things make all of this possible:
-
- The Cireson Service Manager Portal and its API offerings.
-
- Specifically, the “My Work” endpoint we provide customers that enables them to retrieve their work: https://PORTALURL/platform/api/MyWork?$filter=LanguageCode%20eq%20%27ENU%27
-
- The Cireson Service Manager Portal and its API offerings.
“Oh My Posh” is a theme engine for anyone who lives on the shell that wants to do just a bit more with their experience. Installation is quick. You’ll need to:
-
- Install Oh My Posh.
- Install compatible fonts.
- Configure Windows Terminal to use those compatible fonts.
- Configure your PowerShell profile to load Oh My Posh on startup.
Check out the docs yourself over here – https://ohmyposh.dev/docs/installation/windows
-
- You need to install it, you can do that by running the following PowerShell:
Set-ExecutionPolicy Bypass -Scope Process -Force; Invoke-Expression ((New-Object System.Net.WebClient).DownloadString('https://ohmyposh.dev/install.ps1')) -
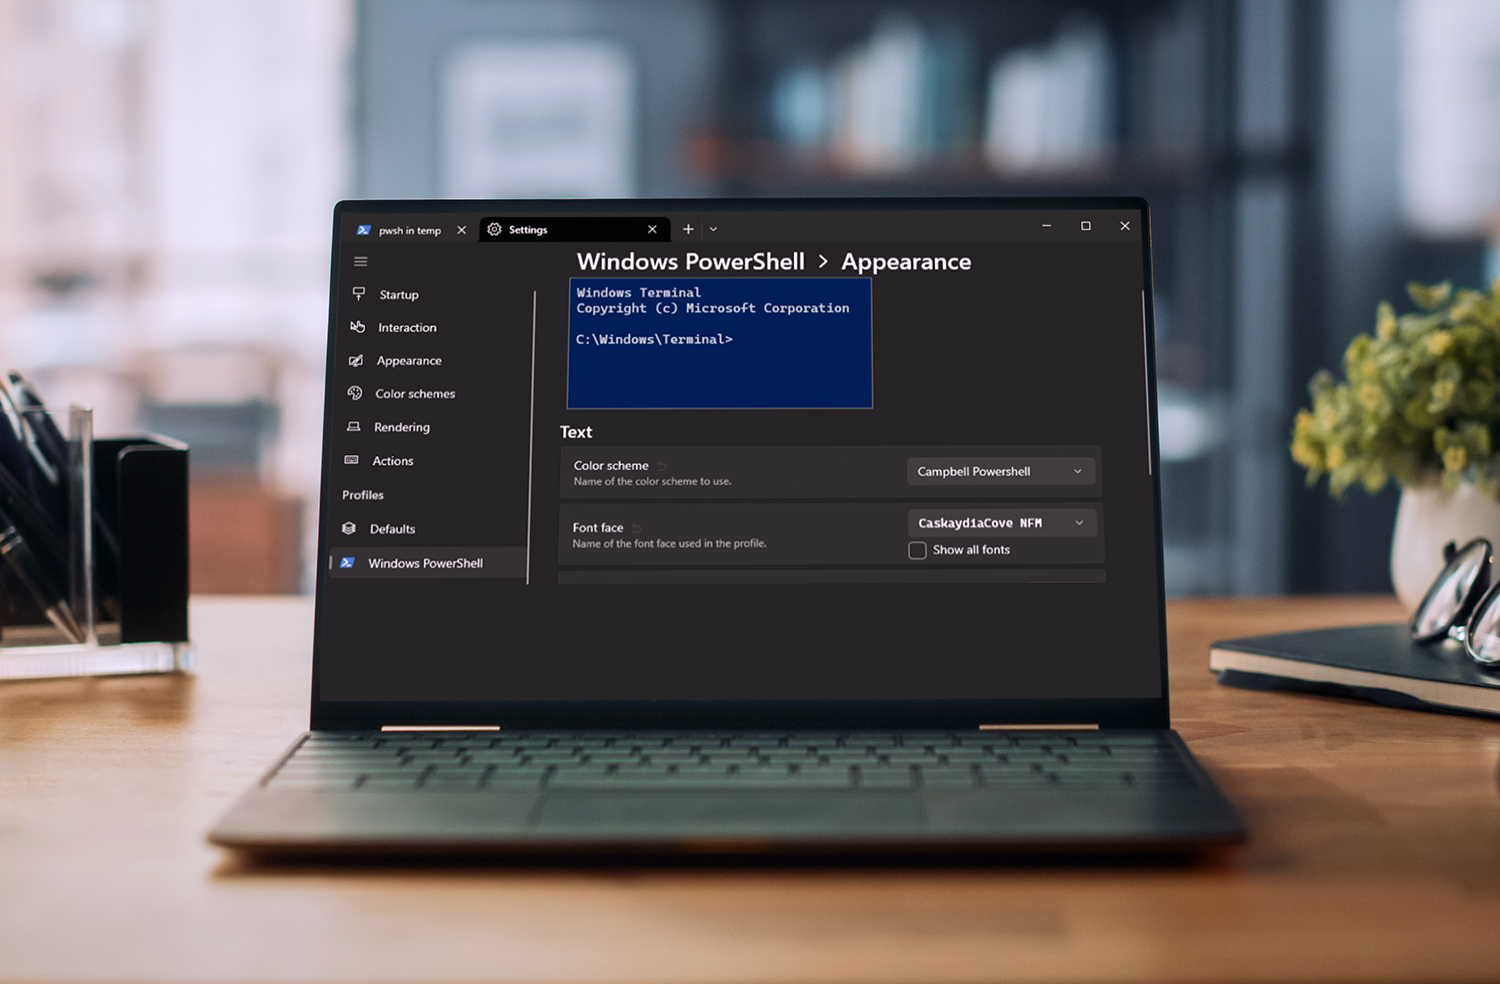
- You will need some compatible fonts, which you can get at NerdFonts. Download something you like and install. I went with CaskaydiaCove. Open up Windows Terminal Settings, and choose the font you recently installed.
-
- Click the down arrow on the toolbar and go to Settings.
- Then choose your shell.
- Scroll down and click “Appearance.”
- Choose/Type the font you recently installed. In my case “CaskaydiaCove NFM.”
- Save.
-
- You need to install it, you can do that by running the following PowerShell:


-
- Finally, let’s head back into your PowerShell tab and set Oh My Posh to load in your PowerShell Profile. You can edit your PowerShell profile by just typing “notepad $profile” and pressing enter.
-
- Don’t have a PowerShell profile? Create one with “New-Item -Path $PROFILE -Type File –Force”. Then open up your profile with “notepad $profile”
-
- Finally, let’s head back into your PowerShell tab and set Oh My Posh to load in your PowerShell Profile. You can edit your PowerShell profile by just typing “notepad $profile” and pressing enter.
-
- In your PowerShell profile, add this at the top:
-
& ([ScriptBlock]::Create((oh-my-posh init pwsh --config "$env:POSH_THEMES_PATHjandedobbeleer.omp.json" --print) -join "`n"))
-
- In your PowerShell profile, add this at the top:
-
- Open a new PowerShell tab and you should see a new layout which includes your current username, directory and a few other properties.
The next question is how do you modify what you see here? Where are the other themes? Can you create our own themes? Where are themes stored? To figure out where you are headed next, lets discover the path to the Themes directory with the following PowerShell command:
$env:posh_themes_pathThen navigate over to the directory returned. This directory includes all of themes provided by Oh My Posh that you can change to simply by updating your PowerShell Profile with the correct name. For now, let’s duplicate (copy and paste the jandedobbeleer.omp.json file into the same directory) the default one you set in step 5 above. Give it a name such as:
scsm.omp.json
Then open it up in VSCode so you can make some changes. The JSON file features a “segments” property that you can copy and paste the following into. But before you do that, you’ll want to perform a find and replace for PORTALURL and APIKEY.
{"type": "command","style": "powerline","foreground": "#ffffff","background": "#da680a","powerline_symbol": "ue0b0","properties": {"shell": "pwsh","command": "$url = 'http://PORTALURL/platform/api/MyWork?$filter=LanguageCode%20eq%20%27ENU%27';$header = @{'Authorization' = 'Bearer APIKEY'};$workItems = Invoke-RestMethod -uri $url -Headers $header | Select-Object value -ExpandProperty value;($workItems | ?{$_.WIType -eq 'Incident'}).Count"},"template": "{{ .Output }}"},{"type": "command","style": "powerline","foreground": "#ffffff","background": "#0ada18","powerline_symbol": "ue0b0","trailing_diamond": "ue0b0","properties": {"shell": "pwsh","command": "$url = 'http://PORTALURL/platform/api/MyWork?$filter=LanguageCode%20eq%20%27ENU%27';$header = @{'Authorization' = 'Bearer APIKEY'};$workItems = Invoke-RestMethod -uri $url -Headers $header | Select-Object value -ExpandProperty value;($workItems | ?{$_.WIType -eq 'ServiceRequest'}).Count"},"template": "{{ .Output }}"},{"type": "command","style": "powerline","foreground": "#ffffff","background": "#b8113d","powerline_symbol": "ue0b0","trailing_diamond": "ue0b0","properties": {"shell": "pwsh","command": "$url = 'http://PORTALURL/platform/api/MyWork?$filter=LanguageCode%20eq%20%27ENU%27';$header = @{'Authorization' = 'Bearer APIKEY'};$workItems = Invoke-RestMethod -uri $url -Headers $header | Select-Object value -ExpandProperty value;($workItems | ?{$_.WIType -eq 'Problem'}).Count"},"template": "{{ .Output }}"},{"type": "command","style": "powerline","foreground": "#ffffff","background": "#0d67ef","powerline_symbol": "ue0b0","trailing_diamond": "ue0b0","properties": {"shell": "pwsh","command": "$url = 'http://PORTALURL/platform/api/MyWork?$filter=LanguageCode%20eq%20%27ENU%27';$header = @{'Authorization' = 'Bearer APIKEY'};$workItems = Invoke-RestMethod -uri $url -Headers $header | Select-Object value -ExpandProperty value;($workItems | ?{$_.WIType -eq 'Change Request'}).Count"},"template": "{{ .Output }}"},{"type": "command","style": "diamond","foreground": "#ffffff","background": "#6F4E37","powerline_symbol": "ue0b0","trailing_diamond": "ue0b0","properties": {"shell": "pwsh","command": "$url = 'http://PORTALURL/platform/api/MyWork?$filter=LanguageCode%20eq%20%27ENU%27';$header = @{'Authorization' = 'Bearer APIKEY'};$workItems = Invoke-RestMethod -uri $url -Headers $header | Select-Object value -ExpandProperty value;($workItems | ?{$_.WIType -eq 'Manual Activity'}).Count"},"template": "{{ .Output }}"}
Then, let’s switch our theme to the one above by once again opening up your PowerShell profile (notepad $profile) and making some updates by replacing that original line from step 5 with the following.
& ([ScriptBlock]::Create((oh-my-posh init pwsh --config "$env:POSH_THEMES_PATHscsm.omp.json" --print) -join "`n"))Open up a new PowerShell session in Windows Terminal and you should now have a result very similar to my original photo above that places “My Active Work Items” directly on your command line.
Now it’s worth being clear here on two things you should be mindful of:
-
- Per Oh My Posh documentation. Running PowerShell takes time to spin up that process and run the command. So be mindful that every time you press ENTER those commands are all running and waiting for a response before your terminal is ready to use again. In our own testing, we haven’t experienced any delays. But something to be aware of if this blog inspires you to go further with bringing in other data points.
- You’re placing your API key into a file and like all API keys, should be treated like a password. There are many ways you could secure this key, such as PowerShell Secrets.
As always, we’d love to hear your questions and comments in the Cireson Community. Interested in chatting this further? Watch out for invites to our monthly Community Open Floor, hosted the 2nd Friday of the month. Invites sent the Monday prior.